Learn how to wash your vehicle like a professional detailer with this simple, yet thorough guide.
All products and links can be found at the end of the blog.
Why You Should Wash Your Vehicle
Washing the exterior of your vehicle is one of many ways to maintain the appearance of your ride, but also keeps the different parts of the exterior, such as the paint, trim, glass, etc. from wearing down too fast and becoming a bigger issue. For example, if dust builds up on your vehicle and one day there is a light drizzle of rain it creates water spots that eventually if left there baking in the hot sun, etch the contaminants and minerals from daily driving into the glass impeding your ability to see through your windows. Another issue is bug guts and bird droppings that have an acidic property to them, that if left too long on the paint will wear down the clear coat faster than usual creating weak spots in the paintwork that can lead to rust build.
How to Wash the Exterior of Your Vehicle
There are many different ways to wash your vehicle, but different methods will yield slightly different results. Here, I will go over how I do a very simple exterior detail that delivers consistent results.
Here is a list of things I use for this process (product links at the end):
- 5 gallon buckets
- grit guards (for 5 gallon buckets)
- Wash mitts
- pH neutral car shampoo
- Wheel and tire cleaner
- Tire brush
- Drying towel
- Carnauba wax/paint sealant
- Access to running water
Step 1
You will need to fill two 5 gallon buckets for the “Two Bucket Method,” these buckets can be obtained at Home Depot for a good price. The two bucket method is where one bucket contains your car shampoo and is clean water, whereas the second bucket is only water for rinsing your wash mitt after cleaning a panel. This way you remove dirt and contaminant from the car, clean it out in the rinse bucket, and a clean wash mitt can go into your soapy water bucket for cleaning your vehicle. To keep contaminants from being suspended in the water in the bucket grit guards are useful for separating the dirt and preventing it from floating, creating dirty water below the grit guard, and keeping clean water above. You will also need another 5 gallon filled with clean water and a grit guard for cleaning the wheels and tire.
Before I do any contact washing, I always pre-rinse the vehicle with water to remove the loose dirt and contaminants so I am not dragging it across the paint when I am using my wash mitt. A pressure washer between 1000-1800 psi and 1.2-2.0 gallons per minute (GPM) is ideal for rinsing, but a standard garden works well too for removing the loose dirt.
Step 2
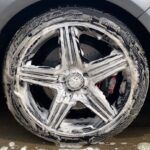
Once the vehicle and wheels are rinsed off, I start cleaning the wheels first, since this is usually the dirtiest part of any vehicle since it’s always contacting the road. For an in-depth guide on how I clean wheels check out my “How to Clean Your Wheels and Tires.” Since the wheel cleaning guide is pretty in-depth and this is a simple guide, start with using your Adam’s Wheel and Tire Cleaner at 1:3 dilution (mildly dirty) or 1:1 dilution (heavily dirty), diluted with water. The Adam’s Tire Brush or 303 Tire Brush can be used to scrub the tires clean. Next, spray the wheel and tire cleaner on the wheels and use a separate wash mitt to clean the wheels. Once done, give a good rinse and the wheels and tires should be all clean.
Step 3
With the wheels and tires cleaned, we can start cleaning the vehicle with the two bucket method and a clean wash mitt. Whenever you wash your vehicle it’s best practice to start from the top down as less dirt and grime is on the top of the vehicle and we do not want to move dirt and grime from the bottom to the top of the vehicle. I split the vehicle in sections to maximize my efficiency and make sure each section of the car is thoroughly cleaned.
I start with the roof, then move to the front windshield, move next to the hood, and lastly the rear windshield and trunk. Every time a section is finished, you want to take the wash mitt and dunk it into the rinse bucket of clean water and move it to the next bucket with clean water and your soap. Make sure to rinse each section once the wash mitt gets into the soapy water bucket. This cleans all the top-facing surfaces and splits the car right down the middle just leaving the bumpers and doors for cleaning.
I next move to the driver’s side and will clean the driver window and rear driver passenger window as one section. The next section is the driver door panel and the rear driver passenger door is another section. I will move towards the rear bumper, doing the rear driver fender as one section, the rear bumpers as another section, and transitioning to the rear passenger side fender as a section.
I will do the same method for the passenger doors like on the driver’s side, doing the windows first, and then moving to the doors. I will do both front fenders next, and leave the front bumper last since all the bug guts are here and we do not want to start here and get bug guts all other the wash mitt and into the water where the bug guts tend to float and get picked up by the wash mitt.
Step 4
Once the car is completely clean along with the wheels and tires, I use a dedicated drying towel to hand dry the vehicle to avoid water spots. I really enjoy the Gauntlet Drying Towel from The Rag Company, which makes drying a breeze. There are multiple sizes and these are the ones I use to get through different size vehicles without having to ring out the towels.
- 20inch x 30 inch – sedans and compact SUVs
- 30inch x 36 inch – SUVs and trucks
Adding Wax or a Paint Sealant to Protect the Hard Work you just did
Waxing a vehicle is a great way to add a natural substance to protect the paintwork and make it easier to wash in the future. Carnuba wax adds the most gloss and shine but generally lasts 1-3 months and gets worn down faster from road grime and does not have the best chemical resistance like bird droppings and bug guts. Paint sealants, on the other hand, will provide anywhere between 1-6 months of protection, some gloss and shine, while providing great resistance to chemicals in an easy-to-apply spray. A couple of carnauba paste waxes I find more friendly to apply and buff off are Meguairs Gold Glass Carnauba Wax and Colnite 845 Insulator Wax. Paint sealants I regularly use and recommend due to price and ease of use are P&S Bead Maker giving about 1 month of protection with amazing slickness and shine or Turtle Wax Seal N Shine Improved Formula which offers 3-6 months of protection, which has amazing chemical resistance and great shine and slickness.
The best way to know the protection on your vehicle is fading away is through washing. You will notice less slickness and a change in hydrophobic properties. What I mean by this is adding a wax or paint sealant makes the car more hydrophobic so water sheds easier in the form of water beads or faster water sheathing. A car with little or no protection will retain and pool water on the surface.
Product List and Links
*All Amazon links are my affiliate link that may or may not earn me a commission if the product is purchased through the link.
- Home Depot 5 gallon bucket – https://www.homedepot.com/p/The-Home-Depot-5-Gallon-Orange-Homer-Bucket-05GLHD2/100087613
- Chemical Guy Cyclone Dirt Trap – https://amzn.to/45hCzrK
- Adam’s Wheel and Tire Cleaner – https://amzn.to/3MxnBqw
- Adam’s Tire Brush (big tires) – https://amzn.to/3pHjMWA
- 303 Tire Brush (small tires) – https://amzn.to/3Ojej2F
- Adam’s Car Shampoo (pH neutral) – https://amzn.to/3Ykb9OT
- Amazon Basics Wash Mitts – https://amzn.to/43P4Zrh
- The Rag Company Cyclone Wash Mitts – https://amzn.to/3DDiRdx
- The Rag Company Drying Towel – https://amzn.to/3Qlue1s
- Collinte 845 Insulator Wax – https://amzn.to/3MEN6G6
- Turtle Wax Seal N Shine – https://amzn.to/3odISfg
- Pressure washer (optional) – https://amzn.to/47ejDep
- Garden Hose attachment – https://amzn.to/3DCcJSL
If you would like to see the end results for some of the vehicles I have down feel free to check out the gallery for the complete look.